In This Article
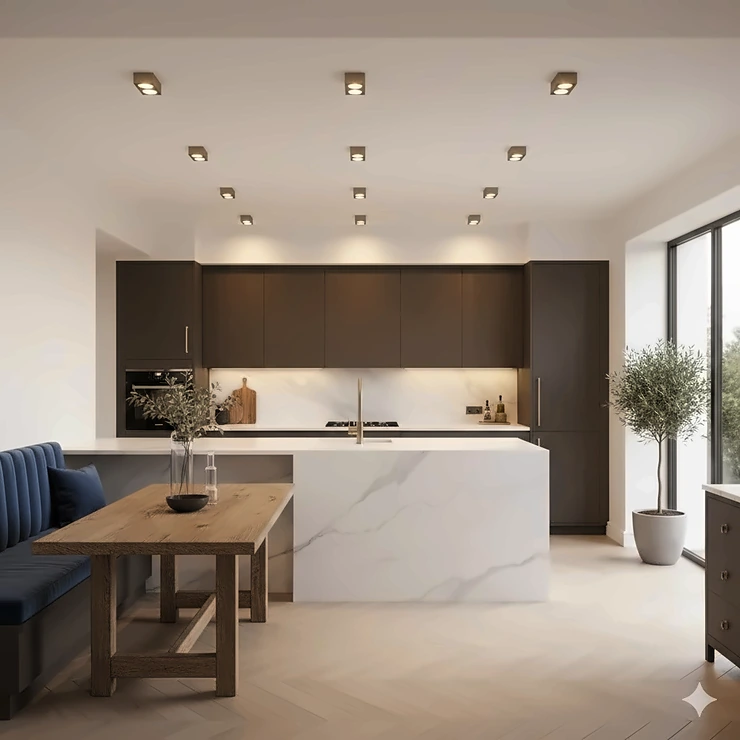
Picture this: you’re chopping vegetables for dinner, but the overhead light casts shadows right where you’re working. Sound familiar? You’re not alone. A poorly planned recessed lighting layout kitchen can turn everyday cooking into a frustrating experience.
Here’s the thing—getting your kitchen lighting right isn’t just about brightness. It’s about creating zones, eliminating shadows, and making your space feel welcoming whether you’re preparing a weekday breakfast or hosting Saturday night dinner parties. The Department of Energy estimates that residential LEDs use at least 75% less energy and last up to 25 times longer than incandescent lighting, making modern recessed lights both eco-friendly and cost-effective.
What makes recessed lighting layout kitchen planning so crucial? Unlike pendant lights or chandeliers that serve as focal points, recessed lights work quietly in the background, providing essential task lighting over counters, ambient illumination throughout the room, and accent lighting to highlight your beautiful backsplash. When spaced correctly—typically 3 to 4 feet apart according to lighting professionals—these fixtures create uniform coverage without harsh shadows or dark corners.
In this comprehensive guide, I’ll walk you through everything from the basic spacing formulas to product recommendations that won’t break the bank. Whether you’re renovating an entire kitchen or simply upgrading old fixtures, you’ll discover how to create a lighting plan that works for your specific layout, ceiling height, and cooking style.
Quick Comparison Table: Top Kitchen Recessed Lights at a Glance
| Product | Size | Lumens | Color Options | Smart Features | Price Range | Best For |
|---|---|---|---|---|---|---|
| Sunco 12-Pack | 6″ | 965LM | 5CCT Selectable | Dimmable | $$ | Budget-conscious renovators |
| Govee Smart | 6″ | 1100LM | RGBIC + 2700-6500K | Matter, Alexa, Google | $$$$ | Smart home enthusiasts |
| Amico 12-Pack | 6″ | 1050LM | 5CCT Selectable | Dimmable | $$ | DIY installers |
| Ensenior 12-Pack | 6″ | 1200LM | 5CCT Selectable | Dimmable | $$ | High brightness needs |
| EDISHINE 12-Pack | 4″ | 800LM | 5CCT + Night Light | Dimmable | $$ | Compact spaces |
| HALO HLBPH | 4″/6″ | 850LM | 5CCT Selectable | Wet-rated | $$$ | Premium quality |
| Baiyilux 24-Pack | 6″ | 1050LM | 6000K Daylight | Dimmable | $ | Large projects |
💬 Just one click – help others make better buying decisions too! 😊
Top 7 Recessed Lighting Products: Expert Analysis
1. Sunco 12 Pack 6 Inch LED Recessed Lights
When it comes to versatility and value, Sunco 12 Pack 6 Inch LED Recessed Lights consistently ranks among the most popular choices for kitchen renovations. This retrofit kit delivers 965 lumens while consuming just 13W—equivalent to a 75W traditional bulb.
Key Specifications:
- Selectable color temperature (2700K/3000K/3500K/4000K/5000K)
- Smooth trim baffle design reduces glare
- Damp-rated for kitchen use
The selectable CCT feature stands out here. Before installation, you simply flip a switch on the junction box to choose your preferred color temperature. Want warm white (2700K) for cozy dinner ambiance? Done. Need bright daylight (5000K) for meal prep? Just slide the switch. Customers appreciate this flexibility, with one reviewer noting they achieved “the perfect lighting balance without having to return products multiple times.”
✅ Pros:
- Five color temperatures eliminate guesswork
- Baffle trim minimizes eye strain
- Easy retrofit installation into existing 5″ or 6″ cans
❌ Cons:
- Not canless (requires existing housing)
- Limited to 965 lumens (may need more lights for large kitchens)
Price Range: Approximately $40-60 for 12-pack Best For: Homeowners upgrading existing recessed can fixtures
2. Govee Smart Recessed Lighting 6 Inch
If you’re building a smart home, the Govee Smart Recessed Lighting 6 Inch deserves serious consideration. This isn’t just another recessed light—it’s a complete lighting ecosystem that works seamlessly with Matter, Alexa, and Google Assistant.
Key Specifications:
- 1100 lumens brightness with RGBIC technology
- Matter-compatible for universal smart home integration
- Adjustable 2700K-6500K white spectrum plus 16 million colors
What sets Govee apart? The segmented backlight control. Unlike basic color-changing lights, the RGBIC technology allows independent color zones within a single fixture, creating dynamic gradient effects perfect for entertaining. The Matter support means these lights work with virtually any smart home platform—no proprietary hub required.
One professional chef using these mentioned: “Being able to voice-control my kitchen lighting while my hands are covered in flour is a game-changer. The warm white mode during cooking and the vibrant colors during parties make this incredibly versatile.”
✅ Pros:
- True smart home integration with Matter support
- 80+ preset scene modes plus custom programming
- Segmented RGBIC for creative lighting effects
❌ Cons:
- Premium pricing (4x cost of basic models)
- Requires stable 2.4GHz WiFi connection
Price Range: $120-160 for 4-pack Best For: Tech-savvy homeowners with smart home systems
3. Amico 12 Pack 6 Inch 5CCT Ultra-Thin LED Recessed Ceiling Light
Amico 12 Pack 6 Inch 5CCT Ultra-Thin LED Recessed Ceiling Light delivers exceptional value for DIY enthusiasts tackling new construction or complete renovations. The canless design with integrated junction box simplifies installation considerably.
Key Specifications:
- Ultra-thin 0.5″ profile requires only 2″ ceiling clearance
- 1050 lumens output, 12W consumption
- IC-rated for safe insulation contact
The integrated junction box eliminates the need for separate can housings, saving both installation time and ceiling space. This makes Amico ideal for kitchens with limited attic access or low ceilings. The ETL and FCC certifications provide peace of mind regarding safety standards.
Customer feedback consistently praises the build quality at this price point. One contractor shared: “I’ve installed hundreds of these across multiple projects. The failure rate is practically zero, and homeowners love the clean look and adjustable color temperatures.”
✅ Pros:
- Canless design speeds up installation
- Minimal 2″ ceiling clearance requirement
- IC-rated for thermal protection
❌ Cons:
- Spring clips can be finicky during installation
- No wet location rating (stick to dry kitchen areas)
Price Range: $60-80 for 12-pack Best For: New construction or gut renovation projects
4. Ensenior 12 Pack 6 Inch LED Recessed Ceiling Light
The Ensenior 12 Pack 6 Inch LED Recessed Ceiling Light pushes the brightness envelope with an impressive 1200 lumens per fixture—noticeably brighter than most competitors while maintaining energy efficiency.
Key Specifications:
- 1200 lumens high brightness output
- 5CCT selectable (2700K-5000K)
- Damp-rated and IC-compliant
Ensenior’s standout feature? The central junction box system available in their premium kits. Instead of wiring each light individually, you connect up to six fixtures to one central box through pre-wired splitters. This dramatically reduces installation time—one electrician reported completing a full kitchen in “half the time compared to traditional wiring methods.”
The extra brightness makes these particularly suitable for kitchens with dark cabinets or limited natural light. However, that intensity means you’ll want to pair them with quality dimmers to avoid overpowering smaller spaces.
✅ Pros:
- Highest lumens in its price category
- Central junction box option for faster installation
- 5-year manufacturer warranty
❌ Cons:
- Higher brightness may require dimming in small kitchens
- Central box system adds upfront complexity
Price Range: $70-90 for 12-pack Best For: Large kitchens or spaces with dark finishes
5. EDISHINE 12 Pack 4 Inch Recessed Light with Night Light
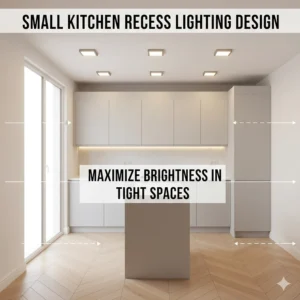
Compact spaces deserve thoughtful lighting, and the EDISHINE 12 Pack 4 Inch Recessed Light with Night Light delivers exactly that. The 4-inch diameter fits perfectly in galley kitchens, above cabinets, or in areas where larger fixtures would overwhelm.
Key Specifications:
- Dual-mode: Main light (10W, 800LM) + Night light (2W, 20LM)
- Three lighting modes via power cycling
- 5CCT selectable color temperature
The night light feature makes EDISHINE uniquely practical. Late-night snack runs no longer require blinding overhead lights—just toggle the switch twice quickly, and you get a gentle 2000K amber glow at 20 lumens. Perfect for those midnight cookie raids without waking the whole house.
The CRI 90+ rating ensures accurate color rendering, which matters more than you’d think when checking if that chicken is perfectly golden or judging the ripeness of avocados.
✅ Pros:
- Innovative night light mode for late-night use
- Compact 4″ size for versatile placement
- Memory function remembers your last setting
❌ Cons:
- Lower total lumens (compensate with additional fixtures)
- Mode switching via power cycling can be unintuitive
Price Range: $55-75 for 12-pack (4-inch) Best For: Galley kitchens, breakfast nooks, or accent lighting
6. HALO HLBPH 4/6 Inch Canless Recessed Downlight
When contractors want reliability, they reach for HALO HLBPH 4/6 Inch Canless Recessed Downlight. With over 65 years in the lighting industry, HALO represents the gold standard—and the premium pricing reflects that heritage.
Key Specifications:
- Available in 4″ or 6″ sizes
- Up to 850 lumens with remote driver/junction box
- Wet location-listed and IC-compliant
HALO’s engineering shows in the details. The heat-treated springs hold fixtures rock-solid—no sagging or light leakage over time. The remote driver design separates heat-generating electronics from the LED module, potentially extending lifespan beyond the standard 50,000 hours.
The wet location rating makes these perfect for areas near sinks or above islands where occasional splashing occurs. One professional kitchen designer noted: “HALO lights are my go-to recommendation for clients who want ‘install it and forget it’ reliability. Yes, they cost more upfront, but I’ve never had a callback for a failed HALO fixture.”
✅ Pros:
- Premium build quality with 5-year warranty
- Wet location listing for sink areas
- Engineered and tested in USA
❌ Cons:
- 2-3x price premium over budget brands
- Remote driver requires more installation planning
Price Range: $100-140 for 4-pack Best For: High-end renovations prioritizing longevity
7. Baiyilux 24 Pack 6 Inch Canless Recessed LED Ceiling Lights
Budget-conscious but tackling a large project? Baiyilux 24 Pack 6 Inch Canless Recessed LED Ceiling Lights offers the lowest per-fixture cost while maintaining acceptable quality for whole-home applications.
Key Specifications:
- 1050 lumens, 6000K daylight (fixed)
- Ultra-thin 0.35″ profile
- 24-pack bulk pricing
The fixed 6000K color temperature might seem limiting, but for task-heavy kitchen environments, that crisp daylight spectrum excels at revealing true colors during food preparation. The anti-glare frosted lens prevents the harsh spotlighting effect common in cheaper fixtures.
At this price point, expect basic functionality without frills. No color temperature selection, no smart features—just straightforward, bright illumination. The IC-rated junction boxes feature thermal protection to prevent overheating when surrounded by insulation.
✅ Pros:
- Lowest cost per fixture for bulk purchases
- 24-pack perfect for whole-house projects
- Adequate quality for rental properties
❌ Cons:
- Fixed 6000K only (no warm white option)
- Basic junction box design
- Higher risk of occasional defective units
Price Range: $80-100 for 24-pack Best For: Landlords, flippers, or large-scale installations
Understanding Recessed Lighting Layout Kitchen Fundamentals
Before drilling a single hole in your ceiling, you need to understand the science behind effective kitchen lighting design. The recessed lighting layout kitchen professionals use isn’t guesswork—it’s based on proven formulas and lighting principles.
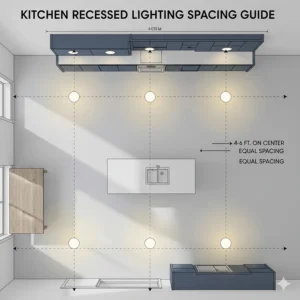
The Basic Spacing Formula
The most widely used rule comes from the Illuminating Engineering Society: space your recessed lights at a distance equal to half your ceiling height. Got an 8-foot ceiling? Position lights approximately 4 feet apart. Ten-foot ceilings? Increase spacing to 5 feet. This formula, referenced across lighting design resources including the Capitol Lighting guide which recommends 3 to 4 feet spacing with about 4-6 lights per 100 square feet, ensures even coverage without creating dark spots or excessive brightness.
But here’s where it gets interesting—that’s just your starting point. Kitchen-specific factors often require adjustments.
Kitchen Zone Lighting Approach
Professional designers divide kitchens into distinct lighting zones, each serving specific purposes:
Task Zones: Areas requiring 50-75 footcandles (fc) of brightness
- Countertops and prep areas
- Range/cooktop surface
- Sink basin
- Island workspaces
Ambient Zones: General illumination at 20-30 fc
- Central floor space
- Dining areas
- Walkways between zones
Accent Zones: Lower intensity highlighting at 10-15 fc
- Upper cabinet displays
- Architectural features
- Decorative backsplashes
According to the Lamps Plus kitchen lighting guide, a common rule of thumb is using one recessed light for every 4 to 6 square feet of ceiling space for even, overall illumination.
Avoiding the Five Fatal Layout Mistakes
Mistake #1: Centering Lights in the Room This seems logical but creates shadows exactly where you work. Instead, center lights over counter edges where food prep happens.
Mistake #2: Ignoring Cabinet Depth Standard upper cabinets extend 12-13 inches from the wall. Place recessed lights 12-18 inches from the wall to prevent cabinets from blocking downward light.
Mistake #3: Uniform Spacing Throughout Not all areas need equal brightness. Increase fixture density over task areas, reduce it in simple walkways.
Mistake #4: Wrong Beam Angle Selection Narrow beam (25-35°) fixtures create spotlights. Use wide beam (40-60°) for general illumination. Mix both types strategically.
Mistake #5: Forgetting Vertical Surfaces Recessed lights positioned too close to walls waste light on the floor. Position them to “wash” upper cabinets and backsplashes.
Ceiling Height Considerations
Standard 8-foot ceilings work beautifully with 4-inch recessed lights spaced 3-4 feet apart. As ceilings rise, adjustments become necessary:
- 8-foot ceilings: 4-inch fixtures, 3-4 foot spacing
- 9-foot ceilings: 5-inch fixtures, 4-5 foot spacing
- 10-12 foot ceilings: 6-inch fixtures, 5-6 foot spacing, consider higher-lumen bulbs
Vaulted or cathedral ceilings require specialized adjustable trims to aim light downward rather than illuminating the slope itself.
Best Recessed Lights for Kitchen: Selection Criteria
Choosing the best recessed lights for kitchen applications involves balancing multiple factors beyond simple brightness. Let me break down what actually matters.
Lumens vs Watts: Understanding LED Efficiency
Forget watts—that’s old thinking from incandescent days. Lumens measure actual light output, and that’s your shopping metric. The Department of Energy notes that LEDs emit light in a specific direction, reducing the need for reflectors and diffusers that can trap light, making them more efficient for recessed downlights.
For kitchens, target these lumen ranges:
- Ambient lighting: 450-600 lumens per fixture
- Task lighting (counters, sink): 650-800 lumens per fixture
- High-output needs (dark cabinets): 1000-1200 lumens per fixture
A 600-lumen LED fixture typically consumes 8-10 watts while delivering the same output as a 60-watt incandescent. The energy savings compound dramatically over the fixture’s 50,000-hour lifespan.
Color Temperature Selection Strategy
Color temperature dramatically affects kitchen ambiance and functionality. Measured in Kelvin (K), here’s how different temperatures perform:
2700K – Warm White Soft, yellowish glow mimicking incandescent bulbs. Creates cozy atmosphere but can distort food colors. Best for dining areas and breakfast nooks.
3000K – Soft White
Slightly cooler while maintaining warmth. Popular compromise for kitchens serving dual purposes (cooking + gathering). Provides adequate task lighting without feeling clinical.
3500K – Neutral White Balanced middle ground. Neither warm nor cool. Works well in transitional-style kitchens or open-concept spaces connecting to living areas.
4000K – Cool White Crisp, clean appearance. Excellent for task lighting and color accuracy when chopping vegetables or evaluating meat doneness. Professional kitchens favor this range.
5000K+ – Daylight Bright, bluish-white mimicking noon sunlight. Maximum color rendering but can feel sterile in residential settings. Consider for task-specific zones only.
My recommendation? Choose selectable color temperature fixtures like the Sunco or Amico models featured above. This flexibility lets you adjust as preferences change without replacing fixtures.
Trim Style Options That Actually Matter
Trim isn’t just aesthetics—it affects light distribution and glare control:
Baffle Trim: Ribbed interior surface diffuses light and minimizes glare. Black baffles create deeper recess appearance. Perfect for task lighting where you’re looking up frequently.
Reflector/Cone Trim: Smooth interior maximizes light output. Chrome or white finishes amplify brightness but can create more glare. Use where maximum illumination matters more than comfort.
Adjustable Gimbal Trim: Directional capability lets you aim light at specific areas. Ideal for highlighting artwork or architectural details, less useful for general kitchen lighting.
Open Trim: No interior shield. Maximum light output, maximum glare potential. Only use in high ceilings or indirect viewing angles.
LED Recessed Lights Kitchen Installation Essentials
Installing LED recessed lights kitchen fixtures has become significantly easier with modern canless designs, but success still requires proper planning and execution.
New Construction vs Retrofit Approaches
New Construction Installation
The easiest scenario happens before drywall goes up. You’ll install either:
Traditional Can Housings: Metal cylinders installed between joists, wired during rough electrical. Drywall installers cut around them. Later, you add trim and LED modules.
Canless Fixtures: Integrated junction boxes mounted directly to joists. Minimal attic space required. Most DIY-friendly option.
For new construction, the Department of Energy recommends using IC-rated housings that are airtight and specifically designed for contact with insulation to prevent overheating and fire risks.
Retrofit Installation
Working with existing ceilings? Two paths forward:
Retrofit Kits: Designed to fit into existing recessed cans. Simply remove old trim and bulb, install new LED module with attached trim. The Sunco retrofit option excels here.
Canless Conversion: Cut 6-inch (or 4-inch) holes using supplied templates. Snap in complete fixture units secured by spring-loaded clips. The Amico and Ensenior options work brilliantly for this approach.
The Critical IC Rating Requirement
If you have insulation in your ceiling (and you should), only use IC-rated recessed fixtures. IC stands for “Insulation Contact”—these fixtures include thermal protection preventing dangerous heat buildup when surrounded by insulation.
Non-IC fixtures require 3-inch clearance from insulation. In finished ceilings, maintaining this clearance often proves impossible. Don’t risk it—the few dollars saved aren’t worth the fire hazard.
Dimmer Compatibility Demystified
Here’s a frustration point: not all LED recessed lights work smoothly with all dimmers. The issue stems from electronic driver circuits inside LEDs interacting differently than old incandescent resistance.
Three dimmer categories for LEDs:
- Leading-Edge (TRIAC): Traditional dimmer technology. Works with some LEDs but can cause flickering or buzzing at low levels.
- Trailing-Edge (ELV): Specifically designed for electronic loads. Smoother dimming, fewer compatibility issues. More expensive but worth it.
- Smart Dimmers: WiFi-enabled dimmers that work through apps. The Govee smart lights pair beautifully with compatible smart dimmers.
Pro tip: Check manufacturer spec sheets for tested dimmer lists. Lutron and Leviton publish extensive compatibility databases. Installing an incompatible dimmer leads to flickering, limited range, or premature LED failure.
Calculating Exact Fixture Quantity
Let’s walk through a real example. Suppose you have a 12′ x 14′ kitchen (168 square feet) with 8-foot ceilings:
Method 1: Square Footage Approach
- 168 sq ft ÷ 4-6 sq ft per light = 28-42 square feet per light
- Result: 4-6 fixtures for general illumination
Method 2: Spacing Formula Approach
- Ceiling height (8 ft) ÷ 2 = 4-foot spacing
- 12′ width ÷ 4′ spacing = 3 fixtures per row
- 14′ length ÷ 4′ spacing = 3.5 rows (round to 4 rows)
- Result: 3 fixtures × 4 rows = 12 fixtures total
Notice the difference? Method 1 assumes you’re relying entirely on recessed lights. Method 2 calculates comprehensive coverage. Most kitchens fall somewhere between—you’ll supplement recessed lights with under-cabinet strips, pendant fixtures over islands, and possibly decorative elements.
For our example kitchen, 8-10 recessed fixtures plus under-cabinet LED strips would provide excellent lighting across all zones.
Dimmable Recessed Lights Kitchen: Flexibility You’ll Actually Use
Installing dimmable recessed lights kitchen fixtures transforms your space from purely functional to genuinely versatile. But dimming capability delivers benefits beyond mood lighting.
The Hidden Energy Savings
Dimming your LEDs to 50% brightness doesn’t save exactly 50% energy, but it comes close—typically 40-45% reduction. Over thousands of hours, those savings compound. Plus, running LEDs at lower power dramatically extends already-impressive lifespans. A fixture rated for 50,000 hours at full brightness might deliver 75,000+ hours when routinely dimmed.
According to ENERGY STAR, LED downlights use 90% less energy than traditional models using incandescent light bulbs and are tested for long-term performance, making them highly cost-effective even before considering dimming benefits.
Scene-Based Kitchen Lighting
Modern life in the kitchen isn’t one-size-fits-all. Different activities demand different lighting:
Morning Coffee Scene (20-30% brightness) Gentle illumination that won’t assault bleary eyes during early breakfast prep. Just enough light to avoid stubbed toes while the coffee brews.
Meal Prep Scene (100% brightness) Full power for chopping, measuring, and cooking. You need to see clearly when handling sharp knives and working with raw proteins.
Dinner Party Scene (40-50% brightness)
Softer ambiance creates intimacy while maintaining enough visibility for serving and eating. Pair with under-cabinet strips for counter glow.
Cleanup Scene (75-80% brightness) Bright enough to spot every crumb and grease splatter but not the harsh glare of full power after a heavy meal.
Late Night Snack Scene (10-15% brightness) Minimal illumination for midnight refrigerator raids without disturbing sleeping family members. The EDISHINE night light mode nails this scenario.
Smart Dimming Technologies
Basic rotary dimmers work fine, but smart dimming opens new possibilities:
WiFi-Connected Dimmers: Control from anywhere via smartphone apps. Pre-program scenes. Schedule automatic dimming at specific times. The Govee ecosystem excels here.
Voice-Controlled Systems: “Alexa, set kitchen to 50%” becomes your new best friend when your hands are covered in cookie dough.
Motion-Activated Dimming: Sensors detect movement and automatically adjust brightness. Walk into the kitchen at 2 AM, lights gently rise to 10%. Leave, and they turn off after 5 minutes.
Circadian Lighting: Advanced systems that automatically adjust color temperature and brightness throughout the day, mimicking natural sunlight patterns. Start with energizing cool white at 6 AM, transition to relaxing warm white by 8 PM.
Recessed Lighting Spacing Kitchen: Room-Specific Guidelines
Every kitchen layout presents unique challenges. Let me break down spacing strategies for common configurations.
Galley Kitchen Spacing (Parallel Walls)
Galley kitchens feature two parallel counter runs with a walkway between. The recessed lighting spacing kitchen approach here focuses on illuminating counter edges rather than the center walkway.
Recommended Layout:
- Position lights 15-18 inches from each wall
- Space lights 30-36 inches apart along each parallel run
- For 8-foot ceilings, use 4-inch fixtures
- Install 2-3 fixtures per counter run depending on length
This creates dual light pools that overlap slightly in the center walkway while preventing shadows at the counter edges where most work occurs.
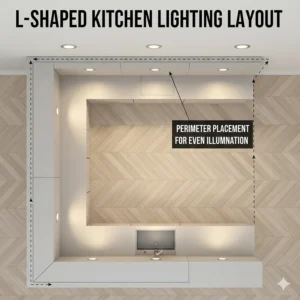
L-Shaped Kitchen Spacing
L-shaped layouts require corner attention. Many DIYers mistakenly skip the corner, creating a dark zone exactly where counters meet.
Recommended Layout:
- Place one fixture centered over the corner junction
- Space additional fixtures 36-40 inches apart along each leg
- Position lights 12 inches from wall to avoid cabinet blockage
- Increase density near the sink and range (30-inch spacing)
For a typical 10′ x 12′ L-shape, expect 6-8 recessed fixtures plus island lighting if applicable.
U-Shaped Kitchen Spacing
U-shaped kitchens offer the most counter space but present the biggest lighting challenge. Three walls of cabinets mean three separate runs requiring coordination.
Recommended Layout:
- Create three parallel runs, each 15 inches from its respective wall
- Space fixtures 36 inches apart on the longer back wall
- Use 30-inch spacing on shorter side walls
- Add corner fixtures where walls meet
- Consider slightly wider spacing (40-48 inches) in the center open area
A standard 12′ x 14′ U-shaped kitchen typically needs 12-14 recessed fixtures for comprehensive coverage.
Open-Concept Kitchen Spacing
When your kitchen flows into living or dining spaces without walls, lighting transitions become critical. Abrupt changes from bright task lighting to dim ambient lighting feel jarring.
Recommended Approach:
- Establish three distinct zones: kitchen work area, transition zone, dining/living space
- Use 36-inch spacing with 800-lumen fixtures in the kitchen proper
- Increase spacing to 48 inches with 600-lumen fixtures in the transition zone
- Further increase to 60-inch spacing with 450-lumen fixtures in living areas
- Put each zone on separate dimmer circuits for independent control
This graduated approach maintains functionality where needed while creating smooth visual transitions.
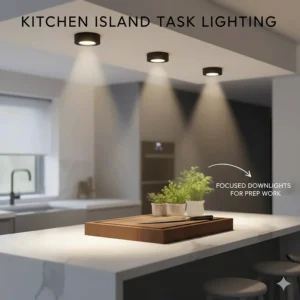
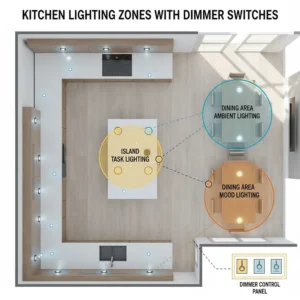
Island Lighting Integration
Kitchen islands deserve special attention. The recessed lighting spacing kitchen designers use above islands depends on the island’s purpose:
For Food Prep Islands: Space 24-30 inches apart directly above the countertop work surface. Use narrow beam angles (25-35°) to concentrate light downward. Avoid lights near the island’s perimeter where people stand—you’ll create annoying head shadows.
For Dining/Gathering Islands:
Wider 36-40 inch spacing works fine. Consider supplementing recessed lights with decorative pendants for visual interest and softer, more intimate illumination during meals.
For Multi-Purpose Islands: Install recessed lights on separate switches from pendant fixtures. Use recessed lights during food prep, switch to pendants alone during dining.
Recessed Light Placement Formula: Professional Designer Secrets
The recessed light placement formula professionals use goes beyond basic spacing to address specific kitchen geometries and user behaviors.
The 30° Rule for Task Lighting
Light positioned directly above a workspace casts shadows from your body and arms right where you’re working. Professional designers use the 30° offset angle to eliminate this problem.
How it works:
- Identify the primary work position (typically the counter’s edge)
- Draw an imaginary 30° angle from that position toward the ceiling
- Place recessed lights where that angle intersects the ceiling plane
- Light now travels over your shoulder instead of being blocked by your body
For standard 24-inch deep counters with 8-foot ceilings, this typically places lights about 15-18 inches from the wall—which coincidentally aligns with our wall clearance guideline.
The Overlapping Pools Method
Rather than treating each fixture as an independent light source, think in terms of overlapping light pools. Each recessed light creates a circular pool on the counter below. Professional layouts ensure these pools overlap by approximately 25-30%.
Calculation approach:
- Determine your fixture’s light pool diameter (depends on beam angle and ceiling height)
- Multiply pool diameter by 0.7 to find ideal spacing
- Round to nearest comfortable measurement
Example: A 6-inch fixture with 40° beam angle at 8-foot ceiling height creates roughly a 60-inch diameter light pool. Optimal spacing = 60″ × 0.7 = 42 inches (use 40 inches for cleaner layout).
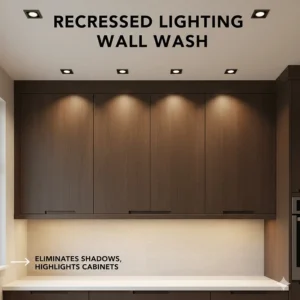
The Wall Wash Technique
Illuminating vertical surfaces—walls, upper cabinets, backsplashes—makes kitchens feel larger and more inviting. The recessed light placement formula for wall washing differs from task lighting.
Wall wash guidelines:
- Position fixtures 24-30 inches from the wall (closer than task lighting)
- Use wide beam angles (50-60°) or specialized wall-wash trims
- Space fixtures 24-30 inches apart along the wall run
- Expect some brightness variation (brighter near lights, dimmer between)
This technique particularly enhances kitchens with decorative tile backsplashes or glass-front upper cabinets you want to highlight.
Symmetry vs Functionality Debate
Here’s where architectural purism clashes with practical lighting. Perfectly symmetrical fixture layout photographs beautifully but often delivers suboptimal illumination. Food prep doesn’t happen symmetrically—it concentrates at specific task zones.
My recommendation: Prioritize function over symmetry within the kitchen proper, but maintain visual balance along sight lines from adjacent rooms. If your kitchen entry offers a direct view of the ceiling, that section deserves symmetric treatment. Behind the island where nobody looks? Function wins.
Kitchen Zones Lighting Plan: Layer Your Illumination
Professional kitchen lighting design employs a layered approach combining multiple lighting types. Your recessed lights form the foundation, but they’re just one element in the complete kitchen zones lighting plan.
Layer 1: Ambient Lighting Foundation
Ambient lighting provides overall room illumination—the baseline brightness allowing safe navigation and creating a welcoming atmosphere. Recessed lights typically shoulder this responsibility.
Ambient layer targets:
- 20-30 footcandles throughout the space
- Uniform distribution without dramatic bright/dark zones
- Color temperature consistency (stick with one temperature for all ambient fixtures)
- Dimmable control for time-of-day and activity adjustment
For our example 168-square-foot kitchen, 6-8 recessed fixtures at 600-800 lumens each delivers 3,600-6,400 total lumens. Divide by square footage: 21-38 footcandles—perfect for ambient lighting.
Layer 2: Task Lighting Precision
Task lighting concentrates higher-intensity illumination exactly where detailed work occurs. Yes, recessed lights contribute here, but they benefit tremendously from supplemental under-cabinet LED strips.
Task layer combinations:
- Recessed lights spaced 24-30 inches apart over key work zones
- Under-cabinet LED strips illuminating counter depth
- Over-sink pendant or recessed cluster
- Range hood integrated lighting
Critical task zones requiring 50-75 footcandles:
- Primary prep counter (typically largest continuous surface)
- Sink area (detail work like vegetable cleaning)
- Range/cooktop (safety and precision)
- Small appliance stations (coffee, toaster, mixer)
The under-cabinet strips prove particularly valuable because they eliminate all shadows cast by your body—they’re positioned at the exact angle to illuminate the work surface directly below your hands.
Layer 3: Accent Lighting Drama
Accent lighting adds visual interest and draws attention to architectural features or decorative elements. This layer operates at lower intensity (typically 10-15 footcandles) and creates depth and dimension.
Accent opportunities in kitchens:
- Glass-front cabinet interiors (use in-cabinet LED pucks or strips)
- Floating shelves (small recessed lights in ceiling above or LED strips below)
- Architectural details (crown molding, coffered ceilings)
- Artwork or decorative backsplashes (narrow-beam recessed adjustable trims)
- Toe-kick lighting (LED strips at floor level under cabinets)
Accent lights should always operate on separate switches from task and ambient layers. This allows creative scene-building—dim the ambient layer while accent lights showcase your beautiful dishware collection during dinner parties.
Creating Lighting Scenes
With three layers on independent controls (ideally dimmers), you can craft specific lighting scenes:
Early Morning Scene:
- Ambient: 25%
- Task (under-cabinet): OFF
- Accent: OFF
- Result: Gentle wake-up lighting
Active Cooking Scene:
- Ambient: 75%
- Task: 100%
- Accent: OFF
- Result: Maximum visibility for safety and precision
Casual Dining Scene:
- Ambient: 40%
- Task: OFF
- Accent: 75%
- Result: Comfortable brightness with visual interest
Entertainment Scene:
- Ambient: 30%
- Task: OFF
- Accent: 100%
- Result: Dramatic atmosphere highlighting design elements
This flexibility transforms a single space into multiple experiences without changing a single fixture.
Energy Efficiency and Cost Considerations
The initial investment in quality LED recessed lights pays dividends through reduced energy costs and minimal maintenance requirements.
Lifetime Cost Analysis
Let’s compare a traditional 65W incandescent recessed light to a 10W LED equivalent over 50,000 hours of use (the typical LED lifespan):
Incandescent Costs:
- Bulbs needed: 50 (each lasts 1,000 hours)
- Bulb cost: 50 × $1.50 = $75
- Energy consumption: 65W × 50,000 hours = 3,250 kWh
- Energy cost (at $0.13/kWh): 3,250 × $0.13 = $422.50
- Total 50,000-hour cost: $497.50
LED Costs:
- Bulbs needed: 1 (lasts 50,000 hours)
- Bulb cost: $15
- Energy consumption: 10W × 50,000 hours = 500 kWh
- Energy cost (at $0.13/kWh): 500 × $0.13 = $65
- Total 50,000-hour cost: $80
Savings per fixture: $417.50 over the LED’s lifetime. Multiply that across 8-12 kitchen fixtures, and you’re looking at $3,340-$5,010 in savings. Even accounting for the higher initial LED cost, payback happens within the first 1-2 years.
ENERGY STAR Certification Benefits
ENERGY STAR certified downlights use 90% less energy than traditional models and are tested for long-term performance with manufacturer-backed warranties of at least three years. When shopping, prioritize ENERGY STAR certified options like many of the products reviewed above.
Additional ENERGY STAR benefits include:
- Verified efficiency and performance standards
- Quality assurance testing for color consistency
- Dimming capability verification
- Longer warranty requirements
Some utility companies offer rebates for ENERGY STAR certified lighting installations. Check your local utility’s website—rebates of $3-10 per fixture can meaningfully offset upfront costs.
Environmental Impact
Beyond personal savings, LED adoption delivers significant environmental benefits. According to the Department of Energy, widespread use of LED lighting could top 569 TWh annually in energy savings by 2035, equal to the annual energy output of more than 92 1,000-megawatt power plants.
Every LED recessed light you install contributes to reduced carbon emissions and decreased demand for electricity generation. Over its lifetime, a single LED fixture prevents approximately 3,000 pounds of CO₂ emissions compared to incandescent alternatives.
Common Installation Challenges and Solutions
Even straightforward recessed lighting installations encounter occasional hiccups. Here are the challenges I see most frequently and their practical solutions.
Problem: Can’t Fit Housing Between Joists
You’ve planned the perfect layout, but ceiling joists aren’t cooperating. Traditional recessed cans require placement between joists, limiting positioning options.
Solution 1: Switch to canless fixtures like the Amico or Ensenior models. Their ultra-thin junction boxes mount directly to joist faces, providing placement flexibility impossible with bulky cans.
Solution 2: Use remodel brackets specifically designed to attach to joist sides. These metal arms extend from one joist across the opening, creating a mounting point wherever needed.
Solution 3: Adjust your layout by 4-6 inches. Minor positional shifts rarely affect overall lighting quality but might align perfectly with joist spacing.
Problem: Flickering at Low Dimmer Levels
You’ve installed your new LED recessed lights and connected a dimmer. Everything seems fine at high brightness, but dimming below 30% causes annoying flicker.
Root cause: Incompatible dimmer-LED pairing. The dimmer’s minimum load exceeds the LED’s low power draw, causing instability.
Solution 1: Replace the dimmer with an LED-rated trailing-edge model. Check the recessed light manufacturer’s recommended dimmer list. Lutron Diva and Caseta dimmers work reliably with most LEDs.
Solution 2: Install a dimmer with adjustable low-end trim. Many quality dimmers include small screws or dials to set the minimum output level. Adjust upward until flicker disappears (usually 10-15% output).
Solution 3: If replacing the dimmer isn’t feasible, increase the load by adding more fixtures to the circuit. Five 10W LEDs (50W total) often work with dimmers expecting 60W+ loads where three fixtures (30W) struggled.
Problem: Uneven Light Distribution
Your recessed lights are installed, but the kitchen feels patchy—some areas too bright, others disappointingly dim.
Diagnostic: This usually stems from mixing incompatible beam angles or incorrect spacing for the chosen beam width.
Solution 1: Verify beam angles on all fixtures. If you’ve mixed wide flood (60°) and narrow spot (25°) trims, the illumination patterns won’t overlap properly. Standardize on one beam angle (typically 40-45° for kitchens).
Solution 2: Add intermediate fixtures in the dark zones rather than increasing all fixture brightness. Two 600-lumen fixtures spaced closer provide better coverage than one 1200-lumen fixture creating a hot spot.
Solution 3: Consider using wall-wash trims (fixtures angled 30° toward walls) for perimeter locations. This technique reduces harsh ceiling reflections while improving counter illumination.
Problem: Buzzing or Humming Sounds
Low-frequency buzzing from LED fixtures drives homeowners crazy, particularly in otherwise quiet kitchens during early morning or late evening.
Root causes: Electronic driver incompatibility with household wiring or dimmer interference.
Solution 1: Ensure tight connections in junction boxes. Loose wiring can create inductance issues causing audible vibration. Verify all wire nuts are snug and secure.
Solution 2: If the buzz only occurs when dimmed, the culprit is dimmer incompatibility. Upgrade to a quality LED-rated dimmer with low electromagnetic interference (EMI).
Solution 3: Some cheaper LED drivers simply produce more noise than quality units. If the buzz persists despite correct wiring and compatible dimmers, replace the budget fixture with a reputable brand like Sunco, HALO, or Ensenior.
Problem: Overheating and Short Lifespan
Your LED recessed lights are failing after just 1-2 years despite 50,000-hour ratings.
Root cause: Inadequate ventilation, often from non-IC-rated fixtures surrounded by insulation or excessive heat buildup in enclosed ceilings.
Solution 1: Verify you’re using IC-rated fixtures if insulation contacts the housing. Never use non-IC fixtures surrounded by insulation—they’ll overheat and fail prematurely.
Solution 2: Ensure adequate ceiling ventilation. Sealed ceilings without attic airflow trap heat. Consider adding soffit vents if the attic space lacks proper ventilation.
Solution 3: Reduce overall wattage density. If you’ve installed twelve 12W fixtures in a small kitchen with limited ventilation, the cumulative heat (144W) might exceed the ceiling’s ability to dissipate it. Use lower-wattage fixtures or reduce the total count.
Maximizing Your Investment: Maintenance and Optimization
Properly maintained LED recessed lights should operate trouble-free for decades. Here’s how to maximize performance and longevity.
Cleaning and Care
Dust, cooking grease, and airborne particles accumulate on recessed light lenses, reducing output by 20-30% over several years.
Quarterly cleaning routine:
- Turn off power at the circuit breaker (never just the switch)
- Gently twist off trim rings
- Wipe lenses with microfiber cloth dampened with glass cleaner
- Clean trim bezels with mild soap solution
- Dry thoroughly before reinstalling
Pro tip: Kitchen recessed lights near ranges accumulate grease vapor faster than other locations. Clean these fixtures monthly rather than quarterly to maintain optimal brightness.
Dimmer Calibration
Modern LED-compatible dimmers often include calibration features allowing fine-tuning for specific fixture characteristics.
Annual calibration process:
- Access the dimmer’s calibration mode (usually pressing and holding specific buttons)
- Adjust the high-end trim to set maximum brightness slightly below 100% (reduces stress, extends life)
- Adjust the low-end trim to eliminate flicker at lowest usable level
- Set fade rate for smooth, gradual transitions
- Save settings
Refer to your dimmer’s instruction manual for specific calibration steps—the process varies between manufacturers.
Firmware Updates for Smart Fixtures
If you’ve invested in smart recessed lights like the Govee system, treat them like any connected device: keep firmware current.
Update schedule:
- Check for updates monthly via the manufacturer’s app
- Enable automatic updates if available
- Read update notes before installing—some updates change behavior or add features
Updated firmware often resolves compatibility issues, improves dimming performance, and occasionally adds new capabilities to existing fixtures.
Documenting Your Installation
Future you will thank present you for maintaining basic documentation:
Create a simple record including:
- Fixture brand, model numbers, and purchase dates
- Quantity and locations (sketch a ceiling map)
- Dimmer models and locations
- Circuit breaker assignments
- Warranty information and registration confirmations
When a fixture eventually fails (and one will, eventually), this documentation makes replacement matching effortless.
✨ Don’t Miss These Exclusive Deals!
🔍 Take your kitchen lighting to the next level with these carefully selected products. Click on any highlighted item to check current pricing and availability. These fixtures will help you create professional-quality illumination your family will appreciate every day!
Frequently Asked Questions
❓ How many recessed lights do I need for a 12x12 kitchen?
❓ Can I install recessed lights in a kitchen with low ceilings?
❓ What color temperature is best for kitchen recessed lighting?
❓ Do recessed lights need to be on the same circuit as other kitchen lights?
❓ How far from the wall should recessed lights be placed in a kitchen?
Conclusion: Creating Your Perfect Kitchen Lighting
Designing an effective recessed lighting layout kitchen requires balancing technical requirements with aesthetic preferences, but the investment in proper planning pays dividends every single day. You’ve learned the fundamental spacing formulas, discovered how ceiling height influences fixture selection, and explored specific products ranging from budget-friendly Baiyilux to premium HALO options.
The key takeaway? Don’t rely on generic one-size-fits-all advice. Your kitchen’s unique geometry, your cooking habits, and your entertaining style all inform the optimal layout. A galley kitchen demands different spacing than an open-concept U-shape. Someone who bakes professionally needs brighter task lighting than someone who primarily reheats takeout.
Start with the proven guidelines—half your ceiling height for basic spacing, 4-6 square feet per fixture for coverage, 12-18 inches from walls for proper distribution. Then customize based on your specific needs. Increase fixture density over primary prep counters. Add supplemental under-cabinet strips for shadow-free task lighting. Install everything on dimmers to create flexibility for different activities and times of day.
The modern LED recessed lights featured in this guide offer remarkable energy efficiency, decades-long lifespans, and sophisticated features like selectable color temperatures and smart home integration. Whether you choose the versatile Sunco retrofit kits, the high-tech Govee smart system, the DIY-friendly Amico canless fixtures, or any combination thereof, you’re investing in quality illumination that will serve reliably for 20-30 years.
Remember—lighting transforms kitchens from purely functional spaces into welcoming gathering spots where families connect, friends socialize, and culinary creativity flourishes. Take the time to plan thoughtfully, install correctly, and enjoy the results every time you flip those switches.
Recommended for You
- Best Semi Flush Mount Kitchen Lighting 2026 (Top 7 Picks)
- 7 Best Flush Mount Kitchen Lighting Options 2026
- 7 Best Farmhouse Pendant Lights Kitchen Island 2026 Guide
Disclaimer: This article contains affiliate links. If you purchase products through these links, we may earn a small commission at no additional cost to you.
✨ Found this helpful? Share it with your friends! 💬🤗