In This Article
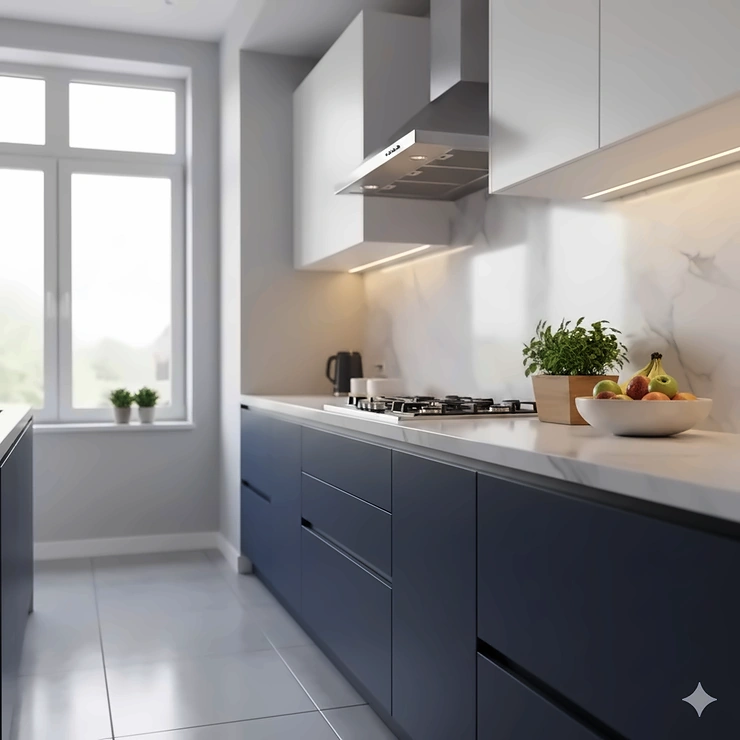
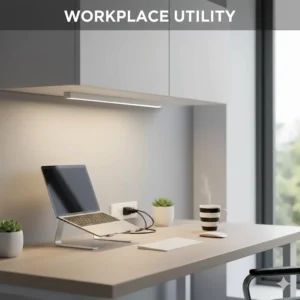
Picture this: you’re prepping dinner in your kitchen, but those overhead lights cast annoying shadows right where you need to see most. Frustrated yet? You’re not alone. I’ve been there, squinting at onions while trying not to slice a finger instead. That’s when LED under cabinet lighting becomes your kitchen’s best friend.
The right LED under cabinet lighting transforms your cooking space from dim and dingy to bright and beautiful. We’re talking about eliminating those pesky shadows, making food prep safer, and honestly, making your countertops look like they belong in a design magazine. Whether you’re upgrading an existing kitchen or planning a renovation, under cabinet lights deliver practical illumination where you actually need it.
What makes 2026 the perfect time to upgrade? Today’s LED under cabinet lights kitchen systems are smarter, more energy-efficient, and ridiculously easy to install compared to just a few years ago. You’ve got options for every budget, from plug-and-play strips you can install in minutes to hardwired systems that look professionally integrated. Plus, with features like adjustable color temperature, dimmable controls, and motion sensors, you’re getting restaurant-quality task lighting without the restaurant budget.
In this comprehensive guide, I’ll walk you through seven stellar LED under cabinet lighting options currently available on Amazon, break down what makes color temperature adjustable under cabinet systems worth considering, explain why CRI rating importance matters for your kitchen, and help you choose the perfect lighting solution for your space.
Quick Comparison Table
| Product | Type | Color Temp | CRI | Brightness | Price Range | Best For |
|---|---|---|---|---|---|---|
| WOBANE 6-Piece Kit | Plug-in Strips | 2700K/6000K | 82+ | 1500 lumens | $30-40 | Best Value |
| DAYBETTER 6-Pack | Plug-in Strips | 2700K-6500K | 80+ | 1500+ lumens | $25-35 | Adjustable Color |
| Litever 6-Bar System | Plug-in/Hardwired | 3000K/5000K | 80+ | 2000 lumens | $35-50 | Brightest Output |
| LAFULIT 8-Piece | Plug-in Strips | 2700K Warm | 80+ | 1400 lumens | $28-38 | Easy Installation |
| Gritin 10.2″ Rechargeable | Wireless Battery | 3000K/4500K/6000K | 80+ | 800 lumens | $30-40 | Renter-Friendly |
| Ansen Hardwired 12″ | Hardwired | 3000K/4000K/5000K | 92+ | 666 lumens | $35-45 | High CRI/Premium |
| EZVALO Motion Sensor | Rechargeable | 3000K/4500K/6000K | 80+ | 750 lumens | $25-35 | Motion Activation |
💬 Just one click – help others make better buying decisions too! 😊
Top 7 LED Under Cabinet Lighting: Expert Analysis
1. WOBANE Under Cabinet LED Lighting Kit – Best Overall Value
When it comes to getting the most bang for your buck, the WOBANE system consistently delivers. This 6-piece kit has earned thousands of glowing reviews for good reason.
Key Specifications:
- 6 pre-cut flexible LED strips (9.8 feet total)
- Adjustable brightness with RF remote control
- Available in 2700K (warm white) or 6000K (cool white)
- 1500 lumens total output
- CRI 82+ for accurate color rendering
WOBANE brings professional-grade illumination to everyday kitchens. The kit includes everything you need: strips, connectors, remote control, dimmer switch, and a 24W power adapter. What I love most is the flexibility – literally. These strips bend around corners and connect in multiple configurations, perfect for L-shaped kitchens or cabinets with odd layouts.
Customer feedback highlights the easy installation process. One reviewer noted they installed the entire system in under an hour with no tools required, just peel-and-stick mounting. The RF remote offers 60 feet of control distance, meaning you can adjust your lighting from across the room.
✅ Pros:
- Excellent value for a 6-piece system
- Flexible design fits any cabinet layout
- Strong adhesive backing holds securely
- RF remote with timing functions
- Can connect up to 14 pieces total
❌ Cons:
- Some units experience flickering after extended use
- Adhesive may weaken on plastic surfaces
Price: $30-40 | Where to Buy: Amazon.com
2. DAYBETTER Under Cabinet Lights – Best Adjustable Color Temperature
Looking for versatility? The DAYBETTER system lets you switch between warm and cool lighting at the touch of a button, making it perfect for setting different moods throughout the day.
Key Specifications:
- 6-piece kit with adjustable color temperature (2700K-6500K)
- Dual control: RF remote and touch dimmer
- 9.8 feet total length
- Memory function saves your preferred settings
- Timer function (30 min to 4 hours)
The standout feature of DAYBETTER is the adjustable color temperature. Morning coffee at 6500K daylight white for an energizing start, then switch to 2700K warm white for cozy evening meal prep. This color temperature adjustable under cabinet system adapts to your lifestyle rather than forcing you to adapt to it.
Installation mirrors the WOBANE system’s simplicity, but DAYBETTER adds versatility with its dual control system. Use the remote from a distance or the convenient touch dimmer mounted near your workspace. Customer reviews praise the memory function, which recalls your last brightness and color temperature settings when you power on.
✅ Pros:
- Full color temperature range (2700K-6500K)
- Dual control options (remote + touch)
- Memory function for convenience
- 6-level brightness adjustment
- Timer auto-off feature
❌ Cons:
- Remote range slightly shorter than competitors
- Some users report connectors can loosen over time
Price: $25-35 | Where to Buy: Amazon.com
3. Litever Under Cabinet LED Lighting Kit – Brightest Output Option
When maximum brightness is non-negotiable, Litever delivers professional-level illumination that rivals expensive hardwired systems.
Key Specifications:
- 6 rigid light bars (12 inches each)
- 2000 lumens total output
- Plug-in or hardwired installation options
- Available in 3000K warm or 5000K daylight
- CRI 80+ with diffused light cover
Litever takes a different approach with rigid aluminum light bars instead of flexible strips. This design choice pays dividends in brightness and longevity. The 2000-lumen output means you’re getting seriously powerful task lighting – perfect for serious home cooks who need to see every detail.
The versatility shines through the dual installation method. Start with plug-in convenience, then have an electrician hardwire them during your next kitchen refresh for a permanently integrated look. Reviews consistently mention the even light distribution with no visible LED dots, thanks to the frosted diffuser cover.
✅ Pros:
- Highest lumen output (2000 lumens)
- Plug-in OR hardwired flexibility
- Rigid bars for stable mounting
- No LED hotspots or dots
- Dimmable with included rotary dimmer
❌ Cons:
- Not compatible with standard wall dimmers
- Rigid design less flexible for corners
- Higher price point
Price: $35-50 | Where to Buy: Amazon.com
4. LAFULIT Under Cabinet Lighting Kit – Easiest Installation
Sometimes you just want something that works right out of the box. LAFULIT specializes in user-friendly design that doesn’t sacrifice quality.
Key Specifications:
- 8 pre-cut 20-inch strips (13 feet total)
- 2700K warm white (cozy ambiance)
- 6 brightness levels
- Extra-long and short connectors included
- 24W power adapter with multiple connection options
The LAFULIT kit stands out for its thoughtful accessories package. You get both 20-inch and 6.7-inch connectors, making it dead simple to navigate around obstacles like microwaves or to jump gaps between separated cabinets. The warm 2700K color temperature creates a welcoming atmosphere that’s easy on the eyes during late-night snacking.
Customer feedback emphasizes the straightforward installation. The DIY-friendly design means you can customize the layout without needing electrical expertise. One user mentioned successfully installing this system in a rental apartment, then easily removing it when moving without damaging the cabinets.
✅ Pros:
- 8-piece kit provides extensive coverage
- Multiple connector sizes for flexibility
- Warm, inviting light quality
- Timer function (30 min – 4 hours)
- Memory function saves preferences
❌ Cons:
- Only available in 2700K (no cool white option)
- Strips can be challenging to install perfectly straight
Price: $28-38 | Where to Buy: Amazon.com
5. Gritin 10.2-Inch Rechargeable – Best Wireless Solution
Renting or not ready to deal with cords? The Gritin rechargeable system offers cord-free convenience without sacrificing functionality.
Key Specifications:
- 10.2-inch rechargeable lights (2-pack)
- 3 color temperatures (3000K/4500K/6000K)
- 5 brightness levels
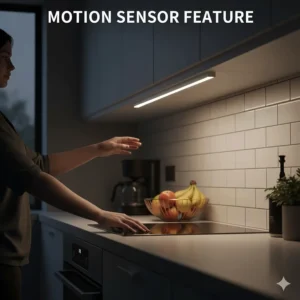
- Motion sensor with 120° detection angle
- 1800mAh battery (8 hours high / 45 days sensor mode)
Gritin solves the biggest pain point of traditional under cabinet lighting: the cords. These battery-powered beauties charge via USB-C and last surprisingly long. The motion sensor feature is brilliant for nighttime kitchen visits – the lights automatically activate when you approach, then turn off after 20 seconds of no motion.
Built with aluminum alloy and durable ABS plastic, these lights feel premium despite the budget-friendly price. The magnetic mounting system makes them perfect for renters or anyone who doesn’t want permanent installations. Reviews highlight the 3-color temperature flexibility, letting you match your lighting to your task or mood.
✅ Pros:
- Completely wireless and rechargeable
- Motion sensor for hands-free operation
- 3 color temperatures + 5 brightness levels
- Magnetic mounting (super easy install/remove)
- Long battery life (45 days in sensor mode)
❌ Cons:
- Shorter length (10.2 inches) means you may need multiple units
- Battery performance degrades over time
- Requires regular recharging
Price: $30-40 | Where to Buy: Amazon.com
6. Ansen Hardwired Under Cabinet Lighting – Premium High-CRI Option
For those who prioritize color accuracy and professional-grade quality, Ansen’s hardwired system delivers exceptional performance.
Key Specifications:
- 12-inch hardwired light bar
- Exceptional CRI 92+ (R9 >90)
- 666 lumens per bar
- 3 color temperatures (3000K/4000K/5000K)
- Dimmable with most LED dimmers
- Linkable system
The Ansen system is all about color rendering perfection. With a CRI rating importance above 92 and an R9 value exceeding 90, this lighting reveals colors as they truly are – crucial for food preparation where visual cues matter. The R9 value specifically measures how accurately red tones appear, which directly affects how fresh produce, meats, and sauces look under your lights.
This is a hardwired solution, meaning you’ll need basic electrical knowledge or a professional installer. However, the linkable design allows you to connect multiple units with ROMEX cables for comprehensive coverage. The selectable color temperature feature (3000K/4000K/5000K) lets you choose your preferred ambiance during installation.
✅ Pros:
- Exceptional CRI 92+ with high R9 value
- Professional-grade color accuracy
- Clean, permanent hardwired installation
- Linkable for extensive coverage
- Three color temperature options
❌ Cons:
- Requires hardwired installation (electrician recommended)
- Higher price per unit
- Not suitable for renters or temporary setups
- LED dimmers sold separately
Price: $35-45 | Where to Buy: Amazon.com
7. EZVALO Motion Sensor Under Cabinet Lighting – Best Smart Features
Want your lights to anticipate your needs? EZVALO’s motion-activated system adds convenience to your kitchen routine.
Key Specifications:
- 10-inch rechargeable LED bars (2-pack)
- Motion sensor with adjustable sensitivity
- 2400mAh battery (long-lasting)
- 3 color temperatures (3000K/4500K/6000K)
- 5-level dimming
- Magnetic mounting with included metal plates
EZVALO brings smart lighting features to an accessible price point. The motion sensor automatically activates when you approach and deactivates when you leave, perfect for hands-free operation when you’re carrying groceries or have messy hands. The 2400mAh battery provides extended runtime, and USB charging means you can power them up with any standard phone charger.
The wireless design combined with magnetic mounting makes installation remarkably simple. Attach the included metal plates where you want your lights, then snap the magnetic light bars into place. Need to charge? Just pull them off, plug them in, and snap them back when done. Users love the convenience for pantries, closets, and bathroom cabinets in addition to kitchen applications.
✅ Pros:
- Motion sensor for hands-free activation
- 2400mAh long-lasting battery
- Magnetic mounting (easy install/removal)
- 3 color temperatures + 5 brightness levels
- USB rechargeable convenience
❌ Cons:
- Motion sensor may activate unintentionally
- 10-inch length requires multiple units for larger spaces
- Sensor sensitivity requires initial adjustment
Price: $25-35 | Where to Buy: Amazon.com
✨ Don’t Miss These Exclusive Deals!
🔍 Take your kitchen lighting to the next level with these carefully selected products. Click on any highlighted item to check current pricing and availability. These tools will help you create authentic illumination your family will love!
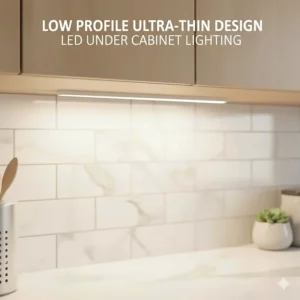
Understanding LED Under Cabinet Lighting Types
Choosing the right LED under cabinet lighting starts with understanding the three main types available. Each offers distinct advantages depending on your needs, installation preferences, and budget.
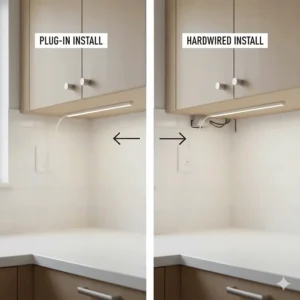
Plug-In LED Strip Lights
Plug-in systems represent the sweet spot between convenience and performance. These dimmable under cabinet LED lights connect directly to a standard wall outlet, eliminating the need for electrical work. You simply stick them under your cabinets, plug them in, and enjoy instant illumination.
The flexibility of LED strips shines when navigating corners and gaps between cabinets. They bend, curve, and conform to virtually any layout. Most quality systems include connectors that let you create custom configurations, jumping over sinks or appliances with ease.
Installation typically takes 30 minutes to an hour for an average kitchen. The adhesive backing on modern strips holds remarkably well – just make sure you clean the mounting surface thoroughly with rubbing alcohol first. One downside? Visible power cords. However, strategic cord routing or cable management clips can minimize this aesthetic concern.
Best plug-in options: WOBANE, DAYBETTER, LAFULIT systems reviewed above deliver excellent performance without professional installation.
Hardwired LED Light Bars
Hardwired systems offer the cleanest, most permanent solution. Once installed by an electrician, there are zero visible cords – everything runs through your walls and connects to your home’s electrical system. These linkable LED systems can be controlled via existing light switches or dedicated dimmers.
The professional appearance comes at a cost, both in installation complexity and price. You’re looking at $200-500 in electrician fees on top of the fixture costs. However, for new construction or major kitchen renovations, hardwired lights integrate seamlessly and add real value to your home.
Performance-wise, hardwired systems often deliver superior brightness and longevity. The rigid light bars provide even illumination without the risk of strips sagging over time. Products like the Ansen system reviewed earlier demonstrate how hardwired options excel in color rendering and professional-grade output.
When to choose hardwired: New builds, major renovations, permanent homes where you want the cleanest possible aesthetic, or when your cabinets have convenient access to electrical wiring.
Wireless Battery-Powered Lights
The rental revolution has arrived! Wireless, rechargeable LED lights solve the biggest challenge for renters or anyone avoiding permanent modifications. No holes, no hardwiring, no damaged cabinets when you move.
Modern rechargeable systems like the Gritin and EZVALO options pack impressive runtime – up to 45 days in motion sensor mode. USB-C charging means you can power them with the same charger you use for your phone or tablet. Magnetic mounting makes installation literally a 30-second job: stick the metal plate, snap on the light, done.
The trade-offs are shorter individual light lengths (requiring multiple units for full coverage) and the need for periodic recharging. Battery capacity also decreases over time, though quality units typically maintain good performance for several years. For closets, pantries, or supplemental lighting, wireless options punch above their weight class.
Perfect scenarios: Rental properties, temporary installations, supplemental lighting for pantries/closets, situations where running power cords is impractical.
Color Temperature Selection: Finding Your Perfect Kitchen Lighting
Ever walked into a kitchen that just felt… off? Chances are, the color temperature was fighting against the room’s vibe. Understanding daylight LED under cabinet lights versus warm white options transforms your space from functional to phenomenal.
What Is Color Temperature?
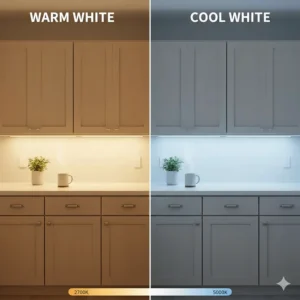
Color temperature, measured in Kelvin (K), describes how “warm” or “cool” light appears. Lower numbers (2700K-3000K) produce warm, yellowish light similar to traditional incandescent bulbs. Higher numbers (5000K-6500K) create cool, bluish-white light resembling noon daylight.
Here’s where it gets interesting: different temperatures serve different purposes in your kitchen. Warm light creates inviting, relaxed atmospheres perfect for entertaining or casual dining. Cool light enhances focus and makes detail work easier – ideal for precise food preparation.
Warm White (2700K-3000K)
Warm white brings cozy, restaurant-quality ambiance to your kitchen. This temperature range makes food look appetizing and creates a welcoming environment for family gatherings. Wood cabinets, warm-toned countertops, and traditional kitchen designs pair beautifully with 2700K-3000K lighting.
The yellowish cast can slightly affect color perception when matching fabrics or checking if that avocado is truly ripe. However, for most home cooking and everyday use, warm white hits the sweet spot between functionality and atmosphere.
Best for: Traditional kitchens, entertaining spaces, evening meal prep, creating cozy ambiance.
Natural White (3500K-4500K)
Natural white occupies the Goldilocks zone – not too warm, not too cool, just right for versatile use. This range closely mimics natural daylight during the morning hours, providing balanced illumination that flatters both people and food.
Many homeowners find 4000K ideal because it works well throughout the day without feeling too clinical (like 6000K can) or too dim (like 2700K might seem during daytime). The neutral tone supports accurate color perception without the harsh feel of bright white.
Best for: Contemporary kitchens, all-day use, balanced color perception, neutral design schemes.
Cool White / Daylight (5000K-6500K)
Daylight LED under cabinet lights deliver maximum brightness perception and sharp visibility. The 5000K-6500K range creates alert, energizing environments perfect for morning routines and detailed tasks requiring precision.
Bakeries, professional kitchens, and detail-oriented cooks favor cool white because it reveals every nuance of color. You’ll immediately notice when vegetables are past their prime or when bread has achieved that perfect golden-brown hue. The downside? It can feel sterile or harsh in the evening, making relaxed dining less cozy.
Best for: Modern kitchens, serious cooking enthusiasts, task-focused lighting, daytime use, maximizing perceived brightness.
Color Temperature Adjustable Systems
Why choose when you can have everything? Color temperature adjustable under cabinet systems like the DAYBETTER let you switch between warm and cool light instantly. Start your morning with energizing 6000K daylight white, then transition to relaxing 2700K warm white for evening wine and cheese.
This flexibility costs slightly more upfront but delivers incredible versatility. You’re not locked into a single atmosphere – your lighting adapts to your activities, time of day, and mood. For kitchens that serve multiple purposes or households with different preferences, adjustable temperature systems solve the “which color temperature” debate permanently.
Best for: Multipurpose kitchens, households with varying preferences, maximizing flexibility, future-proofing your lighting investment.
CRI Rating Importance: Why Color Accuracy Matters in Your Kitchen
Here’s something most people don’t consider until it’s too late: not all LED lights show colors the same way. This is where the CRI rating importance becomes crystal clear, especially for kitchen applications.
Understanding the Color Rendering Index
The Color Rendering Index (CRI) measures how accurately a light source reveals the true colors of objects compared to natural sunlight. The scale runs from 0 to 100, with 100 representing perfect color accuracy identical to sunlight or high-quality incandescent bulbs.
Natural sunlight contains the full spectrum of wavelengths, allowing us to see colors as they truly exist. Artificial light sources often have gaps or spikes in their spectrum, distorting our color perception. A light with poor CRI might make your fresh red tomatoes look brownish or cause you to think your steak is cooked when it’s actually still raw inside.
According to research by the International Commission on Illumination, CRI ratings above 90 are considered excellent for most applications, while ratings below 80 generally produce noticeably poor color rendering that can affect both aesthetics and functionality.
CRI Ranges Explained
CRI 70-80 (Adequate): Basic LED lights often fall into this range. They provide acceptable illumination for hallways or storage areas but struggle with nuanced color differentiation. You might not immediately notice issues, but color-dependent tasks become more challenging. Food appearance suffers, and matching colors for design projects becomes frustratingly difficult.
CRI 80-90 (Good): Most quality LED under cabinet lights kitchen systems target this range as a practical balance between performance and cost. The Illuminating Engineering Society recommends minimum 80 CRI for residential applications where color quality matters. At this level, most colors appear natural, though subtle distinctions may still be challenging in red tones.
CRI 90-95 (Excellent): Professional-grade lighting territory. Colors pop with accuracy approaching natural daylight. Food looks vibrant and appealing, wood tones show their full richness, and paint colors reveal their true character. For serious home cooks and anyone particular about aesthetics, this range delivers noticeable improvements over 80 CRI options.
CRI 95+ (Premium): Approaching perfection. Artists, photographers, and professional chefs work with lights in this range because color accuracy is non-negotiable. The Ansen system reviewed earlier achieves CRI 92+ with high R9 values, revealing even challenging red tones accurately. Is it overkill for everyday cooking? Perhaps. But if you’ve ever struggled to judge doneness or felt disappointed that your expensive granite countertops look dull, high-CRI lighting might be the missing piece.
The R9 Factor
CRI is actually an average of how a light renders eight standardized color samples. However, standard CRI calculations notably exclude one critical color: saturated red (R9). This matters tremendously in kitchens where red tones dominate – tomatoes, raw meat, berries, red bell peppers, beets, and more.
A light can achieve CRI 85 overall while rendering reds poorly (R9 of 20 or less). This explains why some LED lights make food look unappetizing despite decent overall CRI scores. High-quality systems specify both their general CRI and their R9 value. Look for R9 above 50 for good red rendering, or R9 above 90 (like the Ansen system) for exceptional performance.
Practical CRI Applications
For kitchen under cabinet lighting, aim for CRI 85 minimum, with 90+ being ideal. The performance difference between CRI 80 and CRI 90 is immediately visible when preparing colorful dishes or checking food doneness. Higher CRI lighting makes ingredients look more appealing, helping you present beautiful meals that photograph well for those Instagram-worthy dinner shots.
Professional kitchens, art studios, and high-end retail spaces typically specify CRI 90+ as standard because accurate color perception directly impacts their work quality. Home kitchens benefit similarly – you’re making better cooking decisions when you can accurately assess ingredient freshness and preparation progress.
The small premium for high-CRI lighting (typically $5-15 per fixture) pays dividends in enhanced enjoyment of your kitchen space. Your cabinets, countertops, and food all look better, creating a more pleasant environment for the hundreds or thousands of hours you’ll spend there.
Installation Guide: Professional Results for Every Skill Level
Plug-In Strip Installation (Difficulty: Easy | Time: 30-60 minutes)
The beauty of plug-in systems is that anyone can install them successfully. Here’s how to achieve professional-looking results:
Step 1: Planning and Measurement Map out your cabinet layout on paper. Measure the linear feet of cabinets requiring lighting, noting any gaps for sinks or appliances. Most kits include 8-10 feet of strips, so calculate how many kits you’ll need. Don’t forget to identify the nearest outlet location.
Step 2: Surface Preparation This step separates amateur installations from pro-looking results. Clean the mounting surface thoroughly with isopropyl alcohol (70%+ strength). Remove grease, dust, and residue that would compromise adhesive bonding. Let surfaces dry completely – rushing this step ruins adhesion.
Step 3: Test Fit Before Peeling Hold strips in position without removing backing. Check alignment, mark strip endpoints with painter’s tape, and verify connector positions will work with your layout. This dry run prevents costly mistakes.
Step 4: Install Strips Gradually Peel back 2-3 inches of adhesive backing, align the strip carefully, and press firmly. Gradually peel and press along the length, maintaining consistent distance from the cabinet edge (typically 2-3 inches back for best light distribution). Apply firm pressure along the entire length to ensure full contact.
Step 5: Connect and Conceal Wiring Connect strips using included connectors. Route power cords along cabinet edges or through cable clips. Many installations run cords up inside an end cabinet and plug into an outlet inside the cabinet, hiding all visible wiring. Creative routing makes plug-in systems look nearly as clean as hardwired options.
Pro Tips:
- Install lights 2-3 inches back from the cabinet edge for optimal light spread
- Use aluminum channels (purchased separately) for ultra-professional appearance
- Consider smart plugs for voice-control convenience
- Winter installations: warm strips with a hairdryer before applying for better adhesion in cold kitchens
Hardwired Installation (Difficulty: Advanced | Time: 2-4 hours)
Hardwired installations require electrical knowledge and tools. If you’re uncomfortable working with electrical wiring, hire a licensed electrician. Improper installation creates fire hazards and code violations.
Step 1: Power Off and Verify Turn off power at the circuit breaker. Use a voltage tester to confirm power is truly off before touching any wires. This non-negotiable safety step prevents dangerous shocks.
Step 2: Rough-In Wiring Run Romex cable from your power source to each light bar location. For new construction, this happens before drywall. In existing kitchens, you might fish wire through walls or run it inside cabinet backs. Maintain proper stapling distances per electrical code.
Step 3: Mount Junction Boxes Install electrical boxes at each light location following manufacturer specifications. Boxes support the weight of fixtures and contain wire connections safely.
Step 4: Make Wire Connections Connect black to black (hot), white to white (neutral), and green/bare copper to ground following standard electrical practices. Use wire nuts rated for the wire gauge. Tuck connections neatly into boxes.
Step 5: Mount and Link Fixtures Secure light bars to junction boxes. Link multiple fixtures using manufacturer-supplied linking cables. Install in sequence, testing each connection before moving to the next fixture.
Step 6: Install Dimmer Switch Replace a standard switch with an LED-compatible dimmer (must be rated for LED loads). Follow dimmer manufacturer instructions carefully as wiring varies by model.
Pro Tips:
- Linkable systems can connect 8-15 fixtures typically
- LED-rated dimmers prevent flickering and premature failure
- Consider separate switches for different cabinet zones
- Consult local electrical codes before beginning work
Wireless Battery Installation (Difficulty: Very Easy | Time: 5-10 minutes)
Wireless installation is almost absurdly simple, making it perfect for renters or anyone wanting instant gratification.
Step 1: Choose Mounting Method For metal cabinets, attach lights directly using built-in magnets. For non-metal surfaces, peel and stick the included metal mounting plates where you want lights positioned.
Step 2: Attach Lights Snap magnetic lights onto metal surfaces or mounting plates. Adjust positioning as needed – that’s the beauty of magnetic mounting.
Step 3: Charge Batteries Plug USB-C cables into lights and charge until indicator shows full (typically 2-3 hours for initial charge). Most units work while charging, so you can use them immediately.
Step 4: Configure Settings Test motion sensor sensitivity, select your preferred color temperature, and adjust brightness. Most systems remember your settings between uses.
Pro Tips:
- Place motion sensors facing your primary approach path
- Position lights 2-3 inches back from cabinet edge for optimal coverage
- Charge lights quarterly in motion-sensor mode, or more frequently in always-on mode
- Keep USB charging cables accessible for convenient recharging
Measuring Brightness: How Many Lumens Do You Need?
Walk into a lighting store and you’ll see lumens plastered everywhere, but what do those numbers actually mean for your under cabinet lighting?
Understanding Lumens
Lumens measure total light output from a source. More lumens equal more brightness – simple enough. But here’s where it gets practical: how many lumens do you actually need for effective kitchen task lighting?
For reference, a traditional 60-watt incandescent bulb produces about 800 lumens. However, under cabinet lighting requirements differ because you’re illuminating specific work zones, not entire rooms. The light is closer to the task surface (typically 18-20 inches), requiring less raw output to achieve adequate brightness.
Recommended Lumen Ranges
For Task Lighting (Food Prep): 300-500 lumens per linear foot provides excellent visibility for detailed work. At this level, you’ll clearly see knife work, read recipes, and assess food colors accurately. This brightness supports safe, efficient cooking without creating glare.
For Ambient Lighting: 150-250 lumens per linear foot delivers pleasant general illumination. If your under cabinet lights primarily set mood rather than support detailed tasks, this range prevents over-lighting while eliminating dark zones.
For Accent Lighting: 75-150 lumens per linear foot highlights architectural features and creates visual interest. This lower level supplements other light sources, drawing attention to beautiful backsplashes or creating subtle nighttime navigation lighting.
Practical Examples
A 10-foot run of cabinets dedicated to food preparation should target 3000-5000 total lumens. The WOBANE kit at 1500 lumens works well for 5-6 feet of coverage, while the Litever system at 2000 lumens handles 6-8 feet comfortably.
For a full kitchen with 15-20 feet of cabinet coverage, you’ll likely need 2-3 lighting kits to achieve consistent, adequate illumination. Don’t try to stretch one kit to cover too much area – the light quality suffers and you’ll have noticeable dark spots.
The Dimming Advantage
This is why dimmable under cabinet LED lights prove so valuable. Your brightness needs change throughout the day. Morning meal prep might require maximum output (100% brightness), while evening entertaining calls for softer ambiance (30-40% brightness). Dimming also extends LED life and reduces energy consumption when full output isn’t necessary.
Systems with 5-6 dimming levels offer practical flexibility. Stepless dimming (infinitely adjustable) provides ultimate control but adds cost. For most users, 5-level dimming covers all practical scenarios: maximum, high, medium, low, and night light.
Brightness Distribution Matters
High lumen numbers impress, but even distribution matters more for usable lighting. A 2000-lumen strip with hotspots and dark zones performs worse than a 1500-lumen system with smooth, even coverage. This is where rigid light bars with diffuser covers (like the Litever system) excel – they eliminate visible LED dots and create professional-looking uniform illumination.
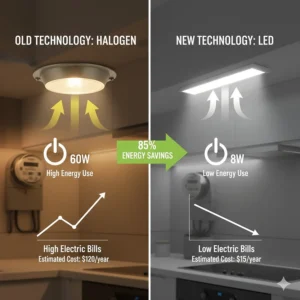
Energy Efficiency and Operating Costs: The LED Advantage
The LED Revolution
Remember those old fluorescent under cabinet lights that took 30 seconds to reach full brightness and hummed annoyingly? LED technology has obliterated those dinosaurs in every measurable way.
LED under cabinet lighting uses 75-85% less energy than comparable incandescent or fluorescent options while lasting 25-50 times longer. Let’s translate that into real-world dollars and convenience.
Calculating Your Costs
A typical LED under cabinet system draws 15-30 watts total for a full kitchen installation. Running 4 hours daily costs approximately $3-6 annually based on average US electricity rates (12 cents per kWh). Compare this to old fluorescent systems at $15-25 annually, and the savings add up quickly.
But the real financial win comes from longevity. Quality LED systems last 25,000-50,000 hours. At 4 hours daily use, that’s 17-34 years of lighting from a single installation costing $30-50. Even cheap fluorescent systems require bulb replacements every 2-3 years, with each replacement costing $10-20 plus labor.
Environmental Impact
Beyond your wallet, LEDs slash environmental impact. Lower energy consumption means reduced power plant emissions. Longer lifespans mean less manufacturing waste and fewer replacement products. LED lights contain no mercury (unlike fluorescent), making disposal safer and simpler.
For the environmentally conscious, LED under cabinet lighting represents an easy win – better performance with dramatically reduced environmental footprint.
Heat Generation
LEDs produce minimal heat compared to incandescent or halogen options. This matters more than you might think. Less heat means:
- Lower cooling costs in summer (incandescent lights add substantial heat load)
- Safer operation near flammable materials
- Reduced cabinet degradation from heat exposure
- Longer life for adhesives and mounting hardware
You can comfortably touch LED strips after hours of operation – try that with halogen puck lights!
Instant On Performance
LEDs reach full brightness instantly. No warm-up period, no flickering start, no waiting. You flip the switch (or trigger the motion sensor), and you have immediate, full illumination. This responsiveness makes sensor-activated systems practical and pleasant to use.
Smart Controls and Further Savings
Pairing LED systems with smart plugs or advanced controls unlocks additional efficiency. Schedule lights to automatically turn off during typical sleeping hours. Use motion sensors to eliminate wasted runtime when the kitchen is unoccupied. Set geofencing so lights disable when everyone leaves home.
These automation options would be silly with cheap incandescent lights due to high operating costs. But with LEDs sipping tiny amounts of power, automation becomes about convenience rather than significant savings.
Troubleshooting Common Issues
Even quality LED systems occasionally misbehave. Here’s how to diagnose and fix the most common problems.
Flickering Lights
Cause 1: Incompatible Dimmer Standard dimmers designed for incandescent bulbs often cause LED flickering. LEDs require specific LED-compatible dimmers that regulate power properly for low-wattage loads.
Solution: Replace with an LED-rated dimmer from Lutron, Leviton, or another reputable brand. Expect to spend $20-40 for quality LED dimmers that eliminate flicker and provide smooth dimming.
Cause 2: Loose Connections Poor connections between strips, between strip and power supply, or at the dimmer create intermittent contact that manifests as flickering.
Solution: Disconnect and reconnect all connections, ensuring firm contact. Check that connector pins aren’t bent or corroded. Replace damaged connectors – most manufacturers sell these separately for a few dollars.
Cause 3: Power Supply Issues Marginal power supplies that can’t quite deliver rated current cause flickering, especially when multiple strips are connected.
Solution: Verify you haven’t exceeded the power supply’s capacity. Most 24W adapters support 8-12 feet of strips maximum. For longer runs, add a second kit or upgrade to a higher-wattage power supply rated for your total strip length.
Adhesive Failure
Cause: Poor Surface Preparation or Low-Quality Tape The #1 reason strips fall: inadequate surface cleaning. Oil, dust, and residue prevent proper bonding.
Solution for Prevention: Clean surfaces with 70%+ isopropyl alcohol. Let dry completely. Apply strips at room temperature (cold adhesive bonds poorly). Press firmly along the entire length for 30 seconds.
Solution for Failed Installation: Remove strips, clean both the surface and strip backing with alcohol. Purchase 3M VHB mounting tape (automotive-grade double-sided tape) and reattach strips. This industrial-strength tape outlasts standard adhesive backing by years.
Alternative Solution: Install aluminum channels designed for LED strips. These professional-looking channels screw or clip to cabinets, eliminating adhesive concerns entirely while creating upscale appearance.
Remote Control Problems
Cause 1: Dead Battery The simplest issue, often overlooked.
Solution: Replace CR2032 coin battery in remote. Most remotes use this standard battery available at any drugstore.
Cause 2: RF Interference Other devices broadcasting on similar frequencies can interfere with remote signals.
Solution: Re-pair remote with receiver using manufacturer instructions (usually involves pressing specific button sequences). If problems persist, move other wireless devices (routers, baby monitors) away from lighting controls.
Cause 3: Obstructed Signal Path RF remotes work through walls, but massive metal appliances or thick barriers can block signals.
Solution: Reposition receiver module closer to your primary control location. Ensure it’s not buried inside metal junction boxes that block signals.
Uneven Brightness
Cause: Voltage Drop As electricity travels through strips, resistance causes voltage drop. The end of long strip runs receives less power, appearing dimmer than the beginning.
Solution: Limit single runs to manufacturer recommendations (typically 8-10 feet maximum). For longer coverage, power strips from both ends or use multiple shorter runs instead of one long run.
Strip Won’t Adhere to Plastic
Cause: Low Surface Energy Some plastic cabinet materials (polyethylene, polypropylene) have naturally slick surfaces that repel adhesives.
Solution: Clean surface, then wipe with lighter fluid or paint thinner to improve bonding. Let dry completely before applying strips. Alternatively, use mechanical mounting (channels with clips) rather than adhesive.
Motion Sensor Too Sensitive/Not Sensitive Enough
Cause: Improper Calibration Motion sensors need adjustment to match your specific environment and preferences.
Solution: Most systems include sensitivity adjustments. Start at medium sensitivity and adjust based on performance. For less sensitive, decrease the detection angle. For more sensitive, increase angle and range settings. Position sensors to face your primary approach path rather than looking parallel to it.
Maintenance and Long-Term Care
Cleaning Your LED Lights
Dust and grease accumulation reduces light output and makes fixtures look dingy. Fortunately, cleaning LED under cabinet lights requires minimal effort.
Monthly Light Cleaning: Wipe with slightly damp microfiber cloth. Avoid soaking exposed electronics. For light grease, add a drop of mild dish soap to your cloth.
Quarterly Deep Cleaning: For sticky grease buildup (inevitable in active kitchens), use a 50/50 mix of vinegar and water. Spray on cloth, not directly on lights. Gently clean, then dry thoroughly.
What to Avoid: Harsh chemicals, abrasive cleaners, excessive moisture near electrical connections, and ammonia-based cleaners that can damage plastic diffusers or discolor adhesive backing.
Battery Maintenance (Rechargeable Systems)
Lithium-ion batteries in wireless systems require occasional care to maximize lifespan.
Optimal Charging Practices:
- Avoid letting batteries fully discharge regularly
- Charge when indicator shows 20-30% remaining
- Don’t leave on charger continuously for months
- Store partially charged (50-70%) if not using for extended periods
Temperature Considerations: Extreme temperatures shorten battery life. If your kitchen frequently exceeds 95°F or drops below 32°F, rechargeable systems may perform poorly. In such cases, plug-in systems prove more reliable.
Connection Integrity
Check connections every 6-12 months. Vibrations from cabinet door closing, thermal expansion/contraction, and normal settling can loosen connections over time.
Inspection Process: Visually check that connectors sit flush and secure. Gently tug each connection point – it shouldn’t separate easily. Tighten loose connections or replace damaged connectors.
Dealing with Failed LEDs
Individual LED failure is rare, but entire strips or fixtures can fail eventually. Most quality systems last 10+ years with typical use, but cheaper options might fail sooner.
If Covered by Warranty: Contact manufacturer with purchase date, photos of issue, and description. Most reputable brands replace defective units, though you typically pay return shipping.
If Out of Warranty: Evaluate repair versus replacement cost. If a $30 strip fails after 5 years of excellent service, replacement usually makes more sense than repair attempts. LED technology improvements mean new systems often outperform old ones anyway.
Smart Home Integration Options
Want to control your under cabinet lighting with your voice or smartphone? Several paths lead to smart lighting nirvana.
Smart Plugs (Easiest Method)
For plug-in LED systems, smart plugs provide instant smart home functionality without replacing your lights.
How It Works: Plug your LED strip power adapter into a smart plug ($10-25), then plug the smart plug into your outlet. Control the lights through the plug’s app, via voice assistants (Alexa, Google Home, Siri), or through automation routines.
Capabilities:
- Voice control: “Alexa, turn on kitchen cabinet lights”
- Scheduling: Auto-on at sunset, auto-off at bedtime
- Remote control from anywhere via smartphone
- Integration with broader smart home scenes
- Energy monitoring (on advanced models)
Limitations: On/off control only. You can’t adjust brightness or color temperature through the plug. Whatever settings you’ve configured on the light’s own remote/dimmer become the default when power applies.
Best Smart Plugs: Kasa Smart Plug Mini (WiFi), Wemo Mini Smart Plug, Wyze Plug (budget-friendly), Philips Hue Smart Plug (if using Hue ecosystem).
Native Smart LED Systems
Some LED systems build smart controls directly into the fixtures, offering advanced capabilities beyond basic on/off.
Full-Featured Control: Adjust brightness, change color temperature, create schedules, and control multiple zones independently through dedicated apps. Systems like the Philips Hue Lightstrip Plus integrate deeply with smart home platforms.
Voice Integration: “Hey Google, dim kitchen lights to 40%” or “Alexa, change kitchen lights to warm white” work seamlessly with native smart systems.
Scene Creation: Program specific light configurations for different activities: “Cooking” scene at 100% brightness with 5000K daylight, “Dinner Party” scene at 50% brightness with 2700K warm white, “Night Light” scene at 10% brightness.
Cost Consideration: Native smart systems cost $60-120 compared to $25-40 for basic systems plus $15 smart plug. The premium buys more sophisticated control and seamless integration.
Switch-Based Control
For hardwired systems, smart switches replace traditional switches while retaining manual control functionality.
How It Works: A smart switch installs in place of your standard light switch, controlling your hardwired LED system. It requires neutral wire at the switch box (most modern homes have this, older homes may not).
Advantages:
- Controls hardwired systems that can’t use smart plugs
- Maintains traditional switch functionality (visitors can use without instructions)
- More reliable than battery-powered devices
- Professional appearance
- Controls multiple linked fixtures from single switch
Popular Options: Lutron Caseta, Leviton Decora Smart, GE Enbrighten, Treatlife (budget-friendly). Prices range from $20-60 per switch depending on features.
Automation Ideas
Smart integration really shines through automation:
Occupancy Routines: Lights automatically turn on when you arrive home, off when everyone leaves (using phone geofencing).
Time-Based Scenarios: Lights come on at sunset, shift from cool white to warm white at 8 PM, turn off at midnight.
Integration with Other Smart Devices: Under cabinet lights brighten when motion sensor detects movement, sync with smart door locks (lights on when door unlocks), coordinate with security systems.
Voice Shortcuts: Create custom voice commands like “Kitchen prep time” that sets lights to 100% brightness, turns on music, and starts a timer.
Comparing Brands: What Makes Quality LED Lighting?
With dozens of brands flooding Amazon, how do you distinguish quality systems from cheap imports that fail within months?
Build Quality Indicators
PCB Construction: Quality strips use double-sided flexible PCBs with double copper traces. Cheap strips use single-layer PCBs that fail faster and may have fire risks. You can’t always determine this from photos, but it’s worth asking manufacturers.
LED Quality: Premium LEDs from manufacturers like Samsung, Osram, or Nichia last longer and maintain brightness better than generic LEDs. Specifications mentioning brand-name LEDs indicate higher quality.
Power Supply Quality: ETL or UL-listed power supplies pass safety testing. They include proper overcurrent protection and won’t cause fires if something goes wrong. Never use unlisted power supplies with LED lighting.
CRI Rating: Reputable brands specify CRI ratings. If specs list no CRI information, assume it’s poor (probably 70-75). Quality systems proudly advertise CRI 80+ or 90+.
Brand Track Record
WOBANE: Established brand with years of solid customer feedback. They focus on LED lighting solutions and support their products with decent warranties. Reviews are generally positive with 4.4-4.6 star averages across products.
DAYBETTER: Newer brand that’s gained traction through competitive pricing and good feature sets. Quality control seems more variable than WOBANE based on review analysis, but many users report satisfaction.
Litever: Premium positioning with excellent build quality and performance. Higher prices reflect superior components and better longevity. Customer service is responsive according to reviews.
Ansen: Professional-grade products targeting serious users. Their high CRI offerings compete with commercial-grade systems at fraction of the price. Limited product range but what they make is excellent.
LAFULIT: Mid-tier brand offering good value. Products work well but aren’t overbuilt. Expect decent performance at competitive prices without premium materials or exceptional longevity.
Warranty Considerations
Reputable brands back their products with 1-2 year warranties. Some premium brands offer 3-5 years. Cheap brands offer 30-90 days or no warranty at all.
Red Flags:
- No brand name listed (generic)
- Zero warranty or less than 90 days
- No responsive customer service
- Specifications that seem too good for the price
- No safety certifications mentioned
Good Signs:
- 1+ year warranty
- ETL or UL certification
- Responsive customer service (check reviews)
- Detailed specifications including CRI
- Real company website (not just Amazon store)
❓ Frequently Asked Questions
❓ How long do LED under cabinet lights last?
❓ Can I cut LED strip lights to custom lengths?
❓ Do LED under cabinet lights work with existing dimmer switches?
❓ What's better for rentals: battery or plug-in under cabinet lights?
❓ How do I prevent dark spots between under cabinet light sections?
Conclusion: Illuminate Your Kitchen the Smart Way
Choosing the right LED under cabinet lighting transforms your kitchen from dimly functional to brilliantly practical. Whether you’re a renter seeking wireless convenience, a homeowner wanting permanent hardwired systems, or somewhere in between, there’s a perfect solution for your needs and budget.
The seven products reviewed in this guide represent the best options currently available, each excelling in specific scenarios. The WOBANE kit delivers unbeatable value for plug-in installations. DAYBETTER offers color temperature flexibility for changing needs throughout the day. Litever provides maximum brightness for serious cooks. Gritin and EZVALO solve the rental dilemma with wireless convenience. Ansen targets perfectionists who demand professional color accuracy. And LAFULIT keeps things simple with foolproof installation.
Remember these key takeaways as you shop:
Prioritize CRI rating importance: Aim for CRI 85+ minimum, 90+ ideally, especially for food prep areas where color accuracy affects cooking decisions and food presentation.
Match color temperature to your space: Warm white (2700K-3000K) for cozy ambiance, cool white (5000K-6500K) for task-focused brightness, or adjustable systems for maximum flexibility.
Calculate brightness needs: Target 300-500 lumens per linear foot for task lighting, less for ambient applications. Don’t stretch one kit across too much area.
Consider your installation type: Renters and DIYers benefit from plug-in or battery systems. Homeowners tackling renovations should explore hardwired options for the cleanest aesthetic.
Plan for dimming: Adjustable brightness extends LED life, reduces energy consumption, and adapts lighting to different times and activities.
The LED under cabinet lighting revolution has made professional-quality illumination accessible to everyone. For $25-50, you can dramatically improve your kitchen’s functionality and appearance. That’s a small investment for something you’ll use daily for years or even decades.
Your countertops will thank you. Your food will look better. Your cooking accuracy will improve. And frankly, your kitchen will just feel better to work in when shadows aren’t hiding half your workspace.
Ready to make the upgrade? Pick the system that matches your priorities from our top seven recommendations, follow the installation guidelines shared in this guide, and start enjoying beautifully lit meal prep sessions. Your future self (the one easily reading recipes and perfectly sautéing vegetables) will be grateful you made the change.
Recommended for You
- 7 Best Track Lighting for Kitchen 2026
- 7 Best Recessed Lighting Layout Kitchen Solutions (2026 Guide)
- Best Semi Flush Mount Kitchen Lighting 2026 (Top 7 Picks)
Disclaimer: This article contains affiliate links. If you purchase products through these links, we may earn a small commission at no additional cost to you.
✨ Found this helpful? Share it with your friends! 💬🤗